In this article I will describe in details (including some examples) how you can build your own SQL Server Management Studio reports that are loaded from Object Explorer. The reports can easily be used on SQL Server 2005, 2008 and 2008R2 environments.
1. Requirements
Firs of all let me start with the basic requirements of the environment you need setup so you can produce such reports. Do not get too scared, it is not that big list. It is actually just one simple application called BIDS (ha ha, yes, this is Microsoft’s Business Intelligence Development Studio, included in SQL Server installation media). But not just any BIDS, but 2005. SSMS have never been upgraded to use the 2008 report viewer component, so the only way your report to be loaded is if it is written on BIDS 2005. For further reference you can check this Connect article.
2. Behind the scenes
One of the most important things you should know about building custom reports is that at runtime (when the report is rendered/executed in SSMS) there are several predefined parameters passed from Object Explorer (OE) to the report and which you can use freely. The parameters and their short explanation you can find below:
Parameter Name
|
CLR data type
|
Comments
|
ObjectTypeName
|
String
|
The type of object. For example, “Database”, “Login”, “Functions”.
|
ObjectName
|
String
|
The name of the object. For example, “Foo”, “AdventureWorksDW”, “GetUserIDFromName”, etc.
|
ErrorText
|
String
|
Used in the Default report to show error information.
|
Filtered
|
Boolean
|
This was used to indicate whether the dataset being passed from OE is filtered or not. We will respect the filters the user has in place in OE and this parameter allows us to indicate on the list reports whether the list is filtered.
|
ServerName
|
String
|
Name of the server and instance currently connected. In the form of “server\instance” for a named instance and “server” for a default instance.
Prompt Name: ServerName
Allow Null: checked
Allow Blank: checked
Avail Values: none
Defaults: none
|
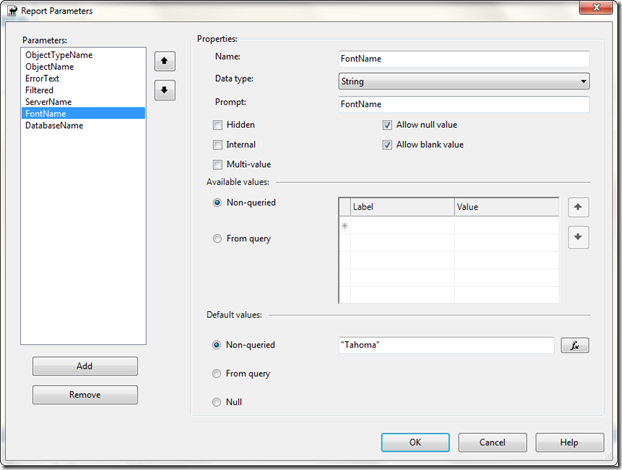
FontName
|
String
|
Name of the font to be used to display the report.
Defaults: Non-Queried – “Tahoma”
|
DatabaseName
|
String
|
Name of the database containing the current object. If the object is not database scoped, this value will be an empty string.
|
As you can see those parameters are the key to create dynamic reports on lower level than SQL Server instance (like database or table).
3. How to start
First you can start with creating a BIDS Report Server project. Having that done, create a Shared datasource to the master database of your SQL instance. Name it “master.rds“.
Second – create a report template, that you can use for further starting point for each report. In this template you have to only setup the parameters. Go to Report -> Parameters and insert all parameters using the info at the above table. Make sure you use the same names and caption. After you are done with that task, your parameters screen should look something like this:
You can also use the below XML, paste it into a text file and rename it to .rdl, add it to your BIDS solution and use it as a template.
<?xml version="1.0" encoding="utf-8"?>
<Report xmlns="http://schemas.microsoft.com/sqlserver/reporting/2005/01/reportdefinition" xmlns:rd="http://schemas.microsoft.com/SQLServer/reporting/reportdesigner">
  <InteractiveHeight>11in</InteractiveHeight>
  <ReportParameters>
    <ReportParameter Name="ObjectTypeName">
      <DataType>String</DataType>
      <Nullable>true</Nullable>
      <AllowBlank>true</AllowBlank>
      <Prompt>ObjectTypeName</Prompt>
    </ReportParameter>
    <ReportParameter Name="ObjectName">
      <DataType>String</DataType>
      <Nullable>true</Nullable>
      <AllowBlank>true</AllowBlank>
      <Prompt>ObjectName</Prompt>
    </ReportParameter>
    <ReportParameter Name="ErrorText">
      <DataType>String</DataType>
      <Nullable>true</Nullable>
      <AllowBlank>true</AllowBlank>
      <Prompt>ErrorText</Prompt>
    </ReportParameter>
    <ReportParameter Name="Filtered">
      <DataType>Boolean</DataType>
      <Nullable>true</Nullable>
      <AllowBlank>true</AllowBlank>
      <Prompt>Filtered</Prompt>
    </ReportParameter>
    <ReportParameter Name="ServerName">
      <DataType>String</DataType>
      <Nullable>true</Nullable>
      <AllowBlank>true</AllowBlank>
      <Prompt>ServerName</Prompt>
    </ReportParameter>
    <ReportParameter Name="FontName">
      <DataType>String</DataType>
      <Nullable>true</Nullable>
      <DefaultValue>
        <Values>
          <Value>"Tahoma"</Value>
        </Values>
      </DefaultValue>
      <AllowBlank>true</AllowBlank>
      <Prompt>FontName</Prompt>
    </ReportParameter>
    <ReportParameter Name="DatabaseName">
      <DataType>String</DataType>
      <Nullable>true</Nullable>
      <AllowBlank>true</AllowBlank>
      <Prompt>DatabaseName</Prompt>
    </ReportParameter>
  </ReportParameters>
  <rd:DrawGrid>true</rd:DrawGrid>
  <InteractiveWidth>8.5in</InteractiveWidth>
  <rd:GridSpacing>0.25cm</rd:GridSpacing>
  <rd:SnapToGrid>true</rd:SnapToGrid>
  <RightMargin>2.5cm</RightMargin>
  <LeftMargin>2.5cm</LeftMargin>
  <BottomMargin>2.5cm</BottomMargin>
  <rd:ReportID>ddeb9983-9825-4554-9cc9-545bb2680e52</rd:ReportID>
  <PageWidth>21cm</PageWidth>
  <Width>4.75cm</Width>
  <Body>
    <ColumnSpacing>1cm</ColumnSpacing>
    <ReportItems>
      <Textbox Name="textbox1">
        <rd:DefaultName>textbox1</rd:DefaultName>
        <Style>
          <Color>SteelBlue</Color>
          <FontFamily>Tahoma</FontFamily>
          <FontSize>20pt</FontSize>
          <FontWeight>700</FontWeight>
          <PaddingLeft>2pt</PaddingLeft>
          <PaddingRight>2pt</PaddingRight>
          <PaddingTop>2pt</PaddingTop>
          <PaddingBottom>2pt</PaddingBottom>
        </Style>
        <CanGrow>true</CanGrow>
        <Height>0.91429cm</Height>
        <Value>00 Template</Value>
      </Textbox>
    </ReportItems>
    <Height>3.15476cm</Height>
  </Body>
  <Language>en-US</Language>
  <TopMargin>2.5cm</TopMargin>
  <PageHeight>29.7cm</PageHeight>
</Report>
4. Standard SSMS report sources
Finally – from this link you can download all reports that are currently available in Management Studio. Some of those reports can run outside SSMS but some of them cannot due to different reasons. However, inside those reports there are quite valuable queries that you can use in your day-to-day tasks or add them to your script bank.

No comments:
Post a Comment